Mapping with QGIS
Written on 2018-12-19
In our modern lives, we take readily available maps for granted. The likes of Google Earth, Apple Maps or Open Street Map mean that high quality, high resolution maps are usually just a mouse click or finger swipe away. But sometimes you may find yourself in a place where the existing maps are just not good enough. Or you require a specialised map for a specific purpose. In such cases, you might end up having to create your own. This post shows you how to do that, using the open source software QGIS.
What is QGIS?
GIS (Geographic Information System) programs are a class of software for working with, analysing and displaying spatial data. Think “Google Earth on steroids”. They are powerful and complex tools used by geographers, field ecologists, historians and many others.
The industry standard GIS application is ArcGIS. Unfortunately, as industry standards tend to, this comes with a hefty price tag. Fortunately, there are good open source alternatives available. Chief among these is the aforementioned QGIS. (If you are interested in other options, look here.)
Once you have downloaded and installed QGIS (either via the link above or from
the Ubuntu repositories with sudo apt install qgis) you are good to go. In the
following I will guide you through the basic steps to create a map with QGIS,
using as an example the map I made of my friends' farm.
Creating the initial map

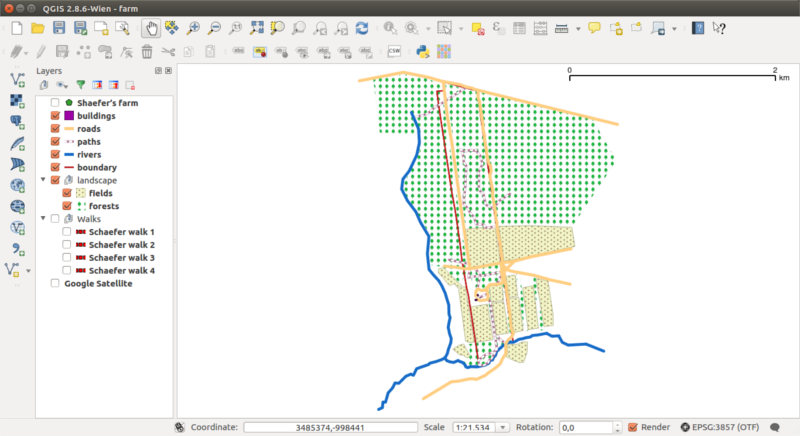
A QGIS project consists of a stack of layers, shown in the left-hand pane in the screenshot above. Their visibility can be turned on and off as desired. A layer may represent raster or vector data – in this example, we will be working exclusively with the latter.
When making a map, I use separate layers for each kind of object I want to add,
such as streams, roads or buildings. Basically, there are three types of vector
layer: points, lines, and polygons. To create a new layer, click the
New Shapefile Layer button at the bottom of the left toolbar. Choose what type
of layer you want and confirm (don't worry about the rest of the dialog for
now). After you have specified a file name and location, the new layer will
appear in your layer stack and may be moved up or down at will.
To add new features, you need to enable editing for this layer. Select the layer
and click the pencil icon (Toggle Editing) in the second-from-top toolbar. You
can now add features (Add Feature button in the same toolbar) or edit them
(using the Node Tool). When Add Feature is on, left-click anywhere on the
map to set the first node, then continue setting nodes until the shape is complete.
Right-click, enter an ID number for this feature, and you're done. Don't forget
to save your layer using the Save Layer Edits button next to the pencil icon.
(Every layer is an individual file and must be saved separately from the whole
project.) If you want to see which features you have added already in a given
layer, clicking the Open Attribute Table in the top toolbar will display a
list. The appearance of a layer may be changed by right-clicking on it and going
to Properties→Style.
When starting on a new map, I find it useful to take a look at a satellite image
of the place. You can do this from within QGIS by using the OpenLayers plugin.
(Install this using the Plugins menu.) Once installed, go to the menu
Web→OpenLayers plugin→Google Maps→Google Satellite. This will add a
new special layer to your project that displays a satellite view in your current
map window. Although this view cannot be printed or saved, it is very useful for
creating a first rough draft for the map. Simply “trace over” it by adding new
vector features on top of the satellite image.
Adding GPS data with Map Plus
As useful as the OpenLayers plugin is, it probably won't get you all the way. Satellite images may be out of date, or the features you want may not be visible on them. (For example, paths in a forest are often hidden under the canopy.) So to get an accurate, complete map, you will have to import GPS data from elsewhere.
Proper GPS devices (such as those by Garmin) are good, but expensive. I have found a smartphone to be a perfectly acceptable replacement for my requirements. To record and export GPS data on iOS, I use an app called Map Plus. It provides all the features I need for mapping, even in the free version. (As I don't use Android, I don't know what an equivalent app would be, but I'm sure there's one around.)
When you've opened Map Plus, touch the arrow button to turn on live location and tap it again to start recording. Now, simply walk the route you want to add to your map. At the end, save the recording and export it to your computer as a KML, GPX, or SHP file (which one doesn't matter, but only KML is available in the free version).
Back in QGIS, click the Add Vector Layer button on the top left and select
your GPS file to open it. Trace over the new line with the appropriate layer(s).
Then lather, rinse, repeat…
Pro Tip: If you install the QTiles plugin, you can create a .mbtiles file
of your map. This can then be back-imported into Map Plus – allowing you to use
your own map on your phone!
Preparing for print
When you have added everything you want to your QGIS project, it is time to
export your map. QGIS provides a basic desktop publishing tool for doing the
necessary layout work. To open this, click Project→New Print Composer.
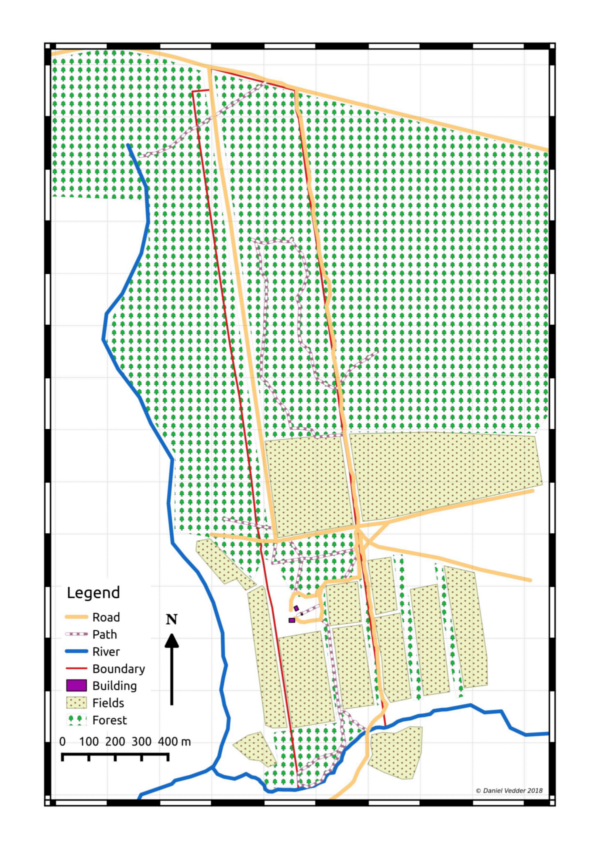
The print composer will show you a blank sheet of paper that you can add your map to. You can select the zoom level, move it around, add a legend and labels, and do a whole host of other things. (For example, I find it useful to have a grid in the map background to better estimate distances.) Admittedly, this tool is a bit fiddly, but when you've played around with it a little you shouldn't have too many problems with it.
And in the end, you get to export your masterpiece to PDF or JPG for printing or publishing:

Conclusion
Maps are beautiful things. Aside from helping us to not get lost, a map gives us a mental image of a place that is hard to get any other way. It shows the big picture, the proportions and angles that are so easily lost when we see a place from the ground perspective. Maps awaken our curiosity and our wanderlust. They help us plan and can even help defend our rights.
Creating an accurate map used to be hard; a difficult and arduous skill reserved for trained specialists. (Read the story of Ordnance Survey for more insight into historical mapmaking.) Nowadays, anybody with a smartphone and a working computer can do it. I found I very much enjoy mapmaking: it combines lots of outdoor exploring with fun work at the computer, and a useful print product to show for it at the end.
And of course, as T.S. Eliot wrote:
We shall not cease from exploration
And the end of all our exploring
Will be to arrive where we started
And know the place for the first time.
Happy mapmaking!
